Photoshop Selection Tools

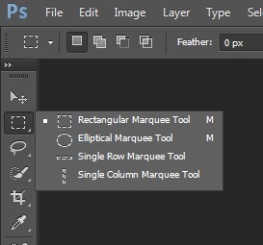
Let’s take a look at our selection tools, technically known as the marquee tool. The marquee tool is the little dotted box second from the top. You may notice a little arrow in the corner. Whenever you see that little arrow it means you can click and hold to choose a different version of the tool.

Image

Your options for this tool are rectangle, elliptical, and straight lines. If you want squares or perfect circles, there’s a trick for that. Hold down the shift key while you click and drag and it’ll create perfect squares, or circles.

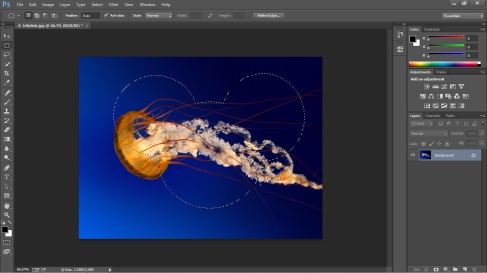
If you press and hold shift BEFORE you click, you’ll get a different function. It’s the add selection function. So if you want to select two squares, this is what you need to do.

Image

So your homework for today is; using what you’ve learned here make a Mickey Mouse selection like I’ve done above.

Good luck!
Tagged , , , , , , , , , , , , ,

The Photoshop Interface

This is a quick look at the overall layout of Adobe Photoshop (gotta start with the absolute basics)

Image

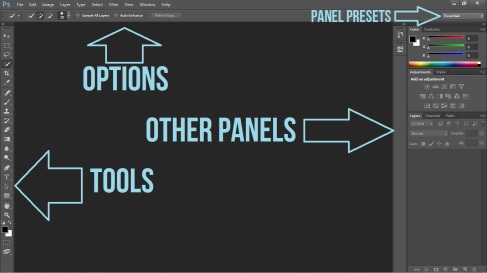
On the left, we’ve got the tools. The top row is our options, these are directly related to the tool we have selected. On the right we have the other panel sets, this can be modified to suit your needs (we’ll get into that in another post), and there’s several presets you can choose from.

And that’s it! Adobe’s not so confusing now is it?

Stay tuned for future updates, where I’ll teach you about the different tools and how to use them, I’ll post tutorials on cool things you can do with Photoshop, and whatever else you guys want to know about – but before all that I want to make sure we all understand the basics.

Subscribe Comment and Share… or don’t! Just do whatever you want – have an awesome day!

Tagged , , ,

File New

So we’re going to start at the very beginning, a good place to start I’ve been told. Making a new document, and what you’re options are when doing this.

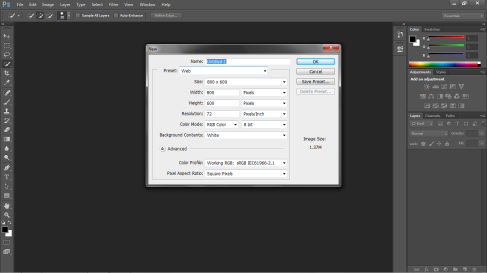
So open up Photoshop, click file in the top left corner and then click new. You’ll get a screen that looks like this

Image

To start you can name your document. Under that take a look at the presets menu. I’ve pulled up the web preset, you can change the size to screen sizes like 1280×1040 or 1600×1200 – which means your image will be screen sized. It’s better to start off with a document that’s the right size than to try and change it later.

So that’s our very first lesson. Leave a question in the comments and I’ll be sure to answer  it!

Tagged , , , , , , , , ,